Accessing ActiveMQ on Mac OSX from a Windows VM
With MassTransit, we support multiple messaging transports, including MSMQ (comes with Windows), ActiveMQ (an open-source Java message broker), and TIBCO EMS (a not-so-open-source message broker). With that in mind, teams building on the Windows platform can comfortably choose MSMQ and enjoy familiar management tools. If your needs expand to multiple platforms, however, the other choices become more important. One of our goals is to enable MassTransit to communicate between services running on Windows, OS X, and Linux. By using the Mono Project to run .NET code on OS X and Linux, and ActiveMQ to handle the messaging, we’re pretty confident that we can reach that goal.
To start working towards this endeavor, I had to first get a working test environment. ActiveMQ can run on Windows, Linux, and OS X. Since Dru Sellers and I both develop on Macs using VMware Fusion to host various versions of Windows, I wanted to install and run ActiveMQ on the Mac host, making it available to any of the virtual machines. I had not really dealt with setting up services on OS X yet, but was happy to learn that it is a pretty slick process to get things installed and running. Hopefully this will help if you decide to do the same.
I should note that I am not an ActiveMQ installation/administration expert. I am configuring ActiveMQ for use in a development environment. If you are going to use ActiveMQ in production, make sure it is configured for proper production operation with the appropriate security, storage, etc. That being said, let’s get started.
Getting Started
You need to download ActiveMQ. I got the Linux version by typing in the URL manually to get it to download using Safari. The archive will be unpacked into a tar file automatically by Safari (if not, just double-click it), which you can then open the tar file into a folder by double-clicking it again. If you are a command-line wizard, you already know how to handle the tar.gz files so enjoy.
Move the unpacked folder (apache-activemq-5.2.0 in my case) to the /usr/local folder by opening Terminal and entering:
sudo mv apache-activemq-5.2.0 /usr/local/
While still in terminal, change to the ActiveMQ folder. We need to modify the configuration.
cd /usr/local/apache-activemq-5.2.0
mate conf/activemq.xml
If you aren’t using TextMate, well, do whatever you need to do to open that file. I removed a lot of unused things from the file, but your needs may vary. You can download my configuration file if you want to use what I am using. You will need to modify the IP addresses to match your environment. I originally tried to use just localhost, but had issues with it connecting from my Windows 7 VM. If this is just a fluke, I’ll update my file later with my new settings.
Installing the launch daemon into OS X
To run ActiveMQ as a service, you need to create a property list that describes the application. This is just an XML file, but we need to create it and put it into the /Library/LaunchDaemons folder and call it com.apache.activemq so we can identify it later. You can download my version of the file to save some typing if you prefer.
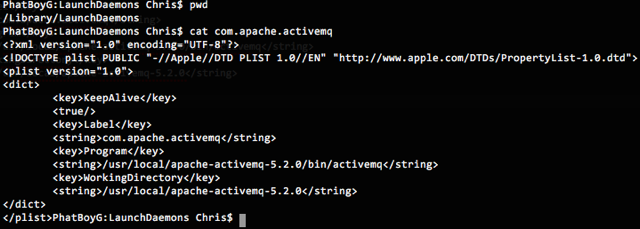
Some of these settings can be adjusted if you don’t want to keep ActiveMQ running all the time. KeepAlive will automatically restart the service if it stops for some reason (including manually stopping it) and you can set that to false if you want to control it manually.
After creating the file, we need to configure OS X so it knows about the new service. To do this, type the following:
sudo launchctl load /Library/LaunchDaemons/com.apache.activemq
sudo launchctl start com.apache.activemq
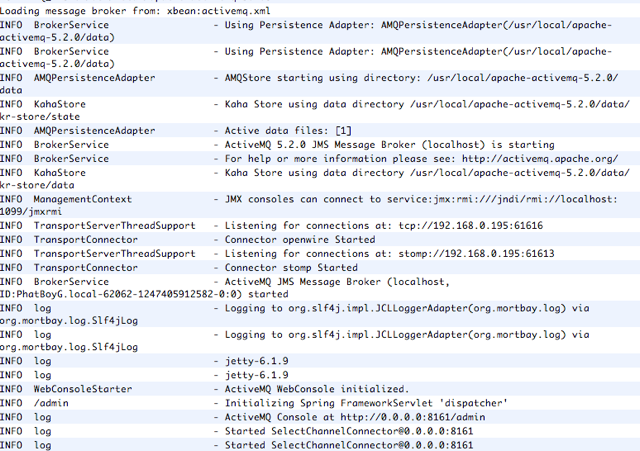
Once you have done this, you can verify that it is started by running the OS X Console application (find it in QuickSilver/Spotlight if you don’t know where it is). Look at the message logs and you can see the startup messages from the service:
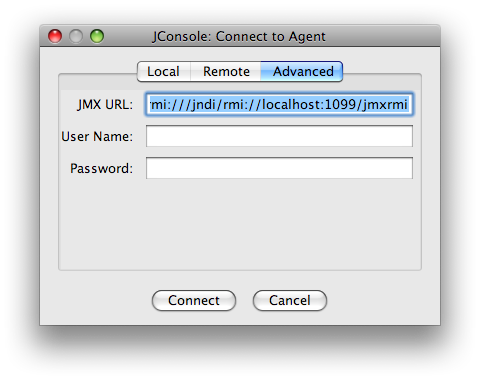
So how do we know that we have a working installation? Well, there is an admin console that you can reach by navigating to http://localhost:8161/admin that will let you view the queues, topics, etc. that are running. You can also use the JMX tools to dig into the queues as well, including the ability to send messages to the queues directly from the Java console! To get the console started, you need to run jconsole from Terminal. Once it is started, you need to connect to the URL that is configured:
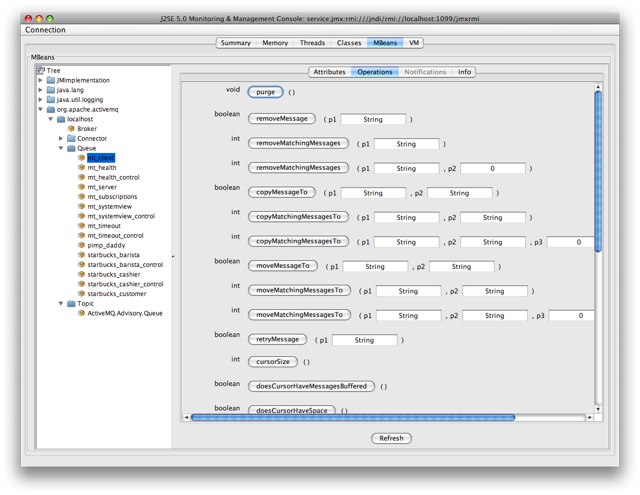
Once you are in the JConsole, you can view all the queues. It should look like this (well, assuming you’ve created some queues, which I’ve done here with the Starbucks sample from MassTransit).
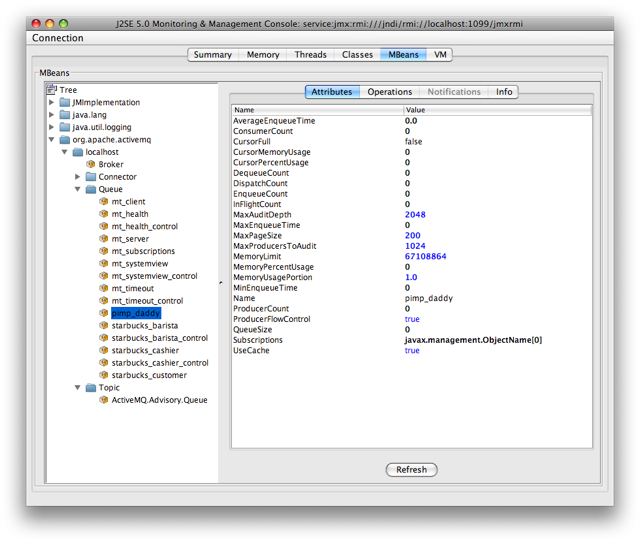
You can see the default URL that was connected to in the title bar, along with the tree view of all the objects. The more interesting tab is the Operations tab, which lets you run commands against the queue. In fact, you can past some XML straight into an input box and click “sendTextMessage” and the message will be stuffed into the queue right there.
So now that we know ActiveMQ is running and happy, we can modify our application to use the ActiveMQ transport instead of the MSMQ transport by simply changing the URI for the endpoint. So instead of msmq://localhost/mt_subscriptions you would specify activemq://192.168.0.195:61616/mt_subscriptions (in my case, that is the IPv4 address of my host machine). As long as the transport is in the same folder and you’re using the StructureMap base registry without specifying a specific transport, it should connect up to the host and start working. The other containers will hopefully get this support soon, it was just easy to add with the Scan() feature of StructureMap’s registry DSL.
I hope to dig deeper into the ActiveMQ transport support in MassTransit, as well as start testing it while running under Mono on OS X over the next few weeks. I already have the Windows bits working, I just want to test more exception cases such as losing the connection to ActiveMQ, as well as other runtime issues to make the code more production ready. I also want to try sending messages to/from other languages, such as Ruby via STOMP, but my Ruby skills are not the greatest.
At the very least, I hope this article helps you get ActiveMQ installed and running on your Mac using OS X Leopard. If you do run into issues or have problems, be sure to visit the MassTransit mailing list and post your questions/issues there.